No products
Your Analyte ELISA Kit
Intended use
The kit is used to detect the level of Your analyte in cell culture, serum blood plasma and other suitable sample solution.
Assay principle
The kit uses a double‐antibody sandwich enzyme‐linked immunosorbent assay (ELISA) to analyze the level of Your analyte in samples. First add sample to wells pre‐coated with one Your analyte antibody to capture availa ble analyte in solution, and perform incubating and washing procedures to remove unbo und substance. Then add second HRP‐conjugated Your analyte antibody to bind the captured analyte, followed by another round of incubation and washing procedures to remove unbound antibody‐ HRP. Finally, HRP substrates are added, incubated for detection, and a blue color is deve loped. Reaction is stopped and color turns to yellow when Stopping Solution (acidic ) is adde d. The yellow color intensity proportionally correlates to the concentration of the Your analyte in samples.
Manufactured and distributed by:
Novatein BiosciencesWest Cummings Park Woburn,MA 01801 USA
Telephone: (617) 238-1396 310
Web: www.novateinbio.com
Materials supplied
| 1 | Precoated Strip‐plate | 12‐well X 8 strips | 7 | Substrate A | 6 mL |
| 2 | Standard ( 40 ng/mL ) | 0.6 mL | 8 | Substrate B | 6 mL |
| 3 | 20 X Wash Solution | 20 mL | 9 | Stopping Solution | 6 mL |
| 4 | Standard Diluent | 6 mL | 10 | Instruction | 1 |
| 5 | Sample Diluent | 6 mL | 11 | Plate Closure Membrane | 1 |
| 6 | HRP‐conjugated antibody | 6 mL | 12 | Sealed Bag | 1 |
Materials required but not supplied
- 1.37 °C incubator
- 2. Standard plate reader capable of measur ing absorbance at 450 nm, with correction wavelength set betwee n 540 nm and 570 nm.
- 3. Precision pipettes and disposable pipette tips
- 4. Distilled water
- 5. Disposable tubes or 96 ‐well plate for sample dilution
- 6. Multi‐channel pipettes, manifold dispenser or automated microplate washer.
- 7. Absorbent paper
Assay procedures
- 1.After taking out from 2‐8°C refrigerator, prewarm the kit 30 minutes at room temperature before using.
- 2. Make standard and sample dilutions in a clean 96 ‐ well plate. Dilute the 20 × Wash Solution to 1X Wash Solution.
- 3. Set standard wells, testing sample and blank wells on the assay plate/strip. Transfer diluted standard 50 μl to standard wells, diluted sample 50 μl to sample wells, sample diluent only to blank wells.
- 4. Incubate the plate for 30 minutes in a 37 °C incubator.
- 5. Decant as much liquid as possible, fill the wells with washing solution, oscillate the plate on a oscillating shaker if available for 1 mi n, decant the washing solution and remove residual liquid with absorbent paper. Repeat wash four times.
- 6. Add HRP ‐ conjugated antibody 50 μl to each well, except the blank well. Mix by shaking gently, and incubate for 30 minutes at 37 °C.
- 7. Wash the plate or strips as described in Step #5.
- 8. Add chromogenic Substrate A and B: Substrate A 50 μl and Substrate B 50 μl to each well. Mix gently, incubate for 15 min at 37 °C.
- 9. Add Stop Solution 50 μl immediately to each well to to p the reaction ( the blue color change to yellow ).
- 10. Measure the optical density (OD) at 450 nm within 15 min
- 11. Construct standard curve ( plotting the mean OD 450 for each standard on the Y ‐ axis against concentration on the X ‐ axis, draw a best ‐ fit log ‐ log curve through the points ) and calculate linear regression equation, then use sample OD values and regression equation to calculate the corresponding sample concen tration. It should be remembered that the sample has been diluted and its actual concentration should be justified by dilution factor(the measurem ent and calculation can be accomplished by software like SoftMax).
Specimen requirements
- 1. Can’t detect the samples containing NaN3 , since NaN3 inhibits HRP (horseradish peroxidase) activity.
- 2. If the specimen can not be tested immediately, it should be kept < ‐ 20 °C and repeated freeze /thaw should be avoided.
- 3. The samples should be cleared by extensive centrifugation to remove any particulates.
- 4. For serum samples, allow blood to clot for 2 hrs at room temperature before centrifuging For 20 minutes at 1000 X g. Remove serum for assay immediately or aliquot and store serum at < 20 °C.
- 5. For plasma, using EDTA or heparin as anti coagulant, spin for 20 minutes at 1000 X g within 30 minutes of collection. Assay immediately or aliquot and store serum at < 20 °C.
Important notes
- 1. The operation should be carried out in strict accordance with the provided instructions.
- 2. To preserve unused strip-wells, it sh ould be stored in the sealed bag.
- 3. Always avoid foaming when mixing or reconstituting protein solutions.
- 4. Pipette reagents and samples into the center of each well.
- 5. The samples should be transferred into the assay wells within 15 minutes of dilution.
- 6. We recommended that all standard, test samp les are tested in duplicate to minimize the test errors.
- 7. Please justify the results w ith dilution factor. Two dilution is recommended for each sample to get the best testing result.
- 8. If the blue color too shallo w after 15 minutes incubation with the substrates, it may be appropriate to extend the incubation time.
- 9. Avoid cross-contamination by changing tips, us ing separate reservoirs for each reagent, avoid using the suction head without extensive wash.
- 10. Do not mix the reagents from different batches
- 11. Stop Solution should be added in the sa me order of the Substrate solution.
- 12. Chromogenic Substrate B is light-sensitive, please avoid prolonged exposure to light. The kit should be kept at 2 – 8 °C and can not be used after expiration date. The Standard should be kept at < 20 °C after receiving.
Procedures in summary
Prewarm all reagents to roomtemperature before assay.
Prepare reagents, standard dilutions, sample dilutions in clean tubes or 96‐well plate.
Transfer standard and samples to assay plate/strip, incubate 30 minutes at 37 °C
Plate‐wash four times, add HRP‐conjugated antibody and incubate 30 minutes at 37 °C
Plate‐wash four times, add Substrate A and B, incubate 15 minutes at 37 °C
Add stop solution
Measure within 15 minutes
Calculation
Result calculation
Get the OD 450 mean value of the duplicate readings for each standard, control, and sample and subtract the average zero standard.
Create a standard curve using computer software capable of generating a log ‐log curve‐fit (Excel, for example). As an alternative, cons truct a standard curve by plotting the mean absorbance for each standard on the y‐axis against the concentration on the x ‐axis and draw a best fit curve through the points on the gra ph. Obtain the linear regression equation, and calculate each sample concentration using this formula.
Typical standard curve
| Standard Concentration ( pg /mL) | Mean OD 450 | Adjusted |
| 0.00 | 0.042 | none |
| 31.20 | 0.073 | 0.03 |
| 62.50 | 0.109 | 0.06 |
| 125.00 | 0.173 | 0.13 |
| 250.00 | 0.313 | 0.271 |
| 500.00 | 0.581 | 0.539 |
| 1000.00 | 1.111 | 0.938 |
| 2000.00 | 2.148 | 2.106 |
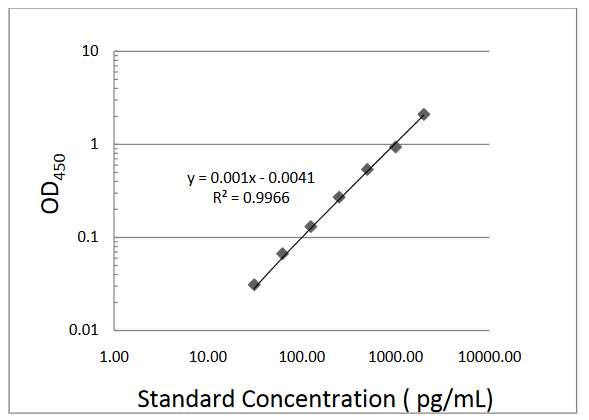
Sample analyte concentration will be 10 x pg/mL, where X = (Y + 0.0041)/0.001, Y is the value of sample OD 450 .
Assay range:0.01–1000 ng/ml
Package size: 96 /T
Storage: 2‐8°C.